Alright, let's talk shed foundations. A lot of folks get excited about the shed itself – the walls, the roof, the color – and then they kind of gloss over what it's actually going to sit on. Big mistake. Your foundation is the backbone of your shed. Skimp on it, and you're asking for trouble down the line: doors that won't close, walls that lean, maybe even a shed that decides to take a walk in a strong wind.
I've seen it all around Moses Lake, from perfectly level, rock-solid sheds to ones that look like they're doing the cha-cha. So, let's break down what you need to know before, during, and after you pour or build that foundation.
Before You Even Dig: Planning is Key
First things first, you need a plan. What kind of shed are you building? How big is it? What are you storing in it? A small garden shed for tools is a lot different from a workshop full of heavy equipment. That'll dictate the type of foundation you need.
You also need to check with the City of Moses Lake or Grant County PUD. Depending on the size and location, you might need a permit. Don't skip this. It's a pain to tear something down because you didn't get the proper approval. Also, think about your property lines and any easements. You don't want your new shed encroaching on your neighbor's space or blocking access to utilities.
Then there's the site itself. Is it level? Is it sloped? What's the soil like? Here in Moses Lake, we've got some pretty sandy, well-draining soil in a lot of areas, which is good for drainage, but it can also mean you need to compact it well or consider a deeper base if you're going for a heavy concrete slab. If you're on a slope, you'll need to do some serious leveling or consider a pier and beam foundation that can accommodate the grade.
Foundation Types: What's Right for You?
There are a few common types of shed foundations, and each has its pros and cons:
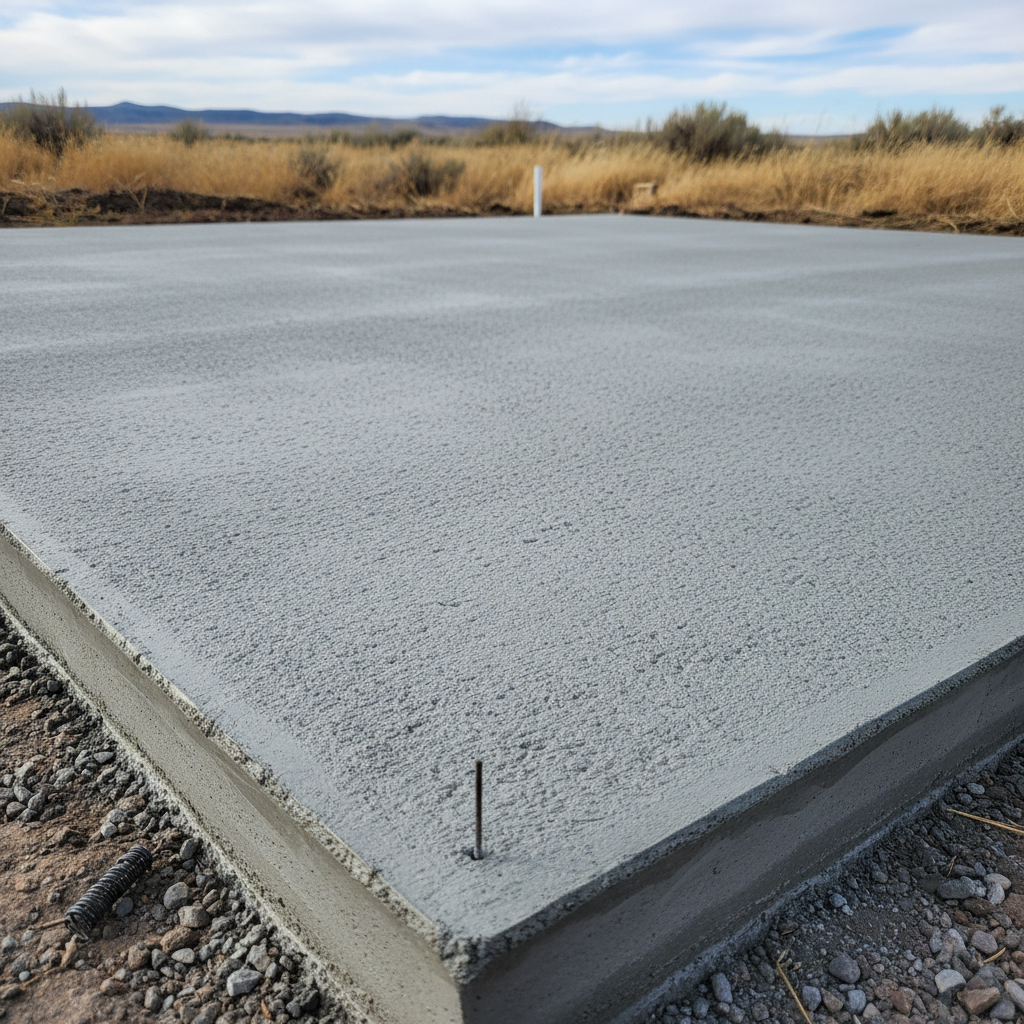
- Concrete Slab: This is probably the most durable and permanent option. It's great for larger sheds, workshops, or anything that needs a really solid, level floor. It keeps moisture out and pests away. The downside? It's the most labor-intensive and expensive, and it's definitely where you might need professional help, especially with pouring and finishing.
- Gravel Pad: A popular choice for many homeowners. It's basically a leveled area with a perimeter frame (usually treated lumber) filled with compacted gravel. It provides excellent drainage and a stable base. This is often a good DIY option if your ground is relatively level to start with.
- Skid Foundation (Runners): This is common for smaller, pre-built sheds. The shed sits on pressure-treated timbers (skids) that rest directly on the ground, often with concrete blocks underneath for leveling. It's the simplest and most affordable, and it allows for some portability. But it's not as stable as a slab or gravel pad, and you've got to make sure those skids are perfectly level and supported.
- Pier and Beam: If you've got a significant slope or want to keep the shed elevated for ventilation or flood protection, this is a good bet. Concrete piers are sunk into the ground, and beams run across them to support the shed floor. This can be a bit more complex to get right, especially ensuring all piers are at the correct height and level.
DIY vs. Calling a Pro: Where to Draw the Line
Here's the honest truth: a gravel pad or a simple skid foundation is often something a handy homeowner can tackle. If you're comfortable with a level, a tape measure, some digging, and maybe operating a plate compactor (which you can rent locally), you can probably get it done.
You'll need to:
- Clear the area of debris, grass, and topsoil.
- Mark out your foundation dimensions accurately.
- Dig down to a consistent depth.
- Build a perimeter frame (for gravel).
- Lay down landscape fabric to prevent weeds.
- Fill with gravel and compact it like crazy.
- Make sure everything is dead level.
Where do you call in the pros? Any time you're dealing with a concrete slab, especially if it's a large one. Getting the forms right, mixing and pouring concrete correctly, ensuring proper rebar placement, and achieving a smooth, level finish is an art form. It's heavy work, it's time-sensitive, and if you mess it up, it's a huge headache to fix. Same goes for complex pier and beam foundations on tricky terrain. You want that thing to last, and a professional concrete crew or a skilled builder like us at Moses Lake Custom Sheds can ensure it's done right the first time.
After the Foundation is Done: A Few Checks
Once your foundation is in, give it time to cure if it's concrete. Don't rush it. For gravel pads, make sure it's settled and still level before you start building or placing your shed. Take a long level and check it in multiple directions. You want it perfect. Any issues now will only compound when you start framing walls.
Also, think about drainage around the foundation. You don't want water pooling up against your shed, even if you have a good foundation. Grade the ground away from the shed, or consider adding some French drains if you're in a low-lying area. Good drainage protects your investment.
Building a shed is a rewarding project, but it starts from the ground up. Don't cut corners on the foundation. It's the one part of the build that's hardest to fix later, and getting it right will save you a lot of headaches and money in the long run.